
What you'll need:
- 18x24 poster board
- 2 pieces of foam (for the lining)
- A bunch of binder clips
- Fabric glue
- Magnetic snap
- A cute button
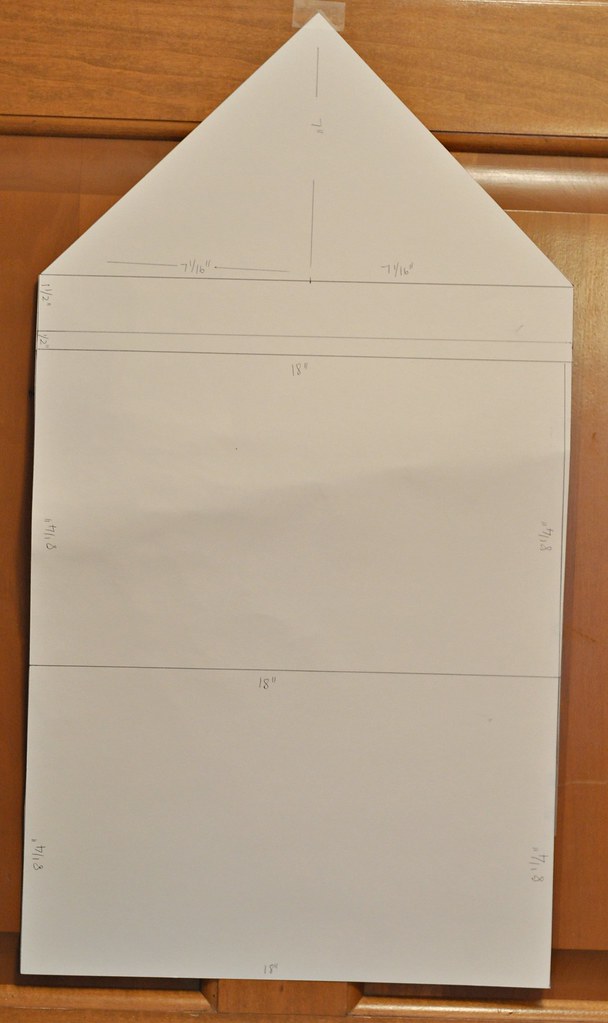
This is the dimensions of my clutch (18 inches wide and 8 1/2 inches high). I draw all my measurements on the poster board and cut it to the actual size. You can adjust whatever size suits your preference. I used my husband's razor blade for all my cuttings. Razors work much better and faster than scissors
Glue 2 pieces of foam onto one side of the drawing. You can buy a bigger piece of foam but my store ran out of them. 2 pieces work just fine for me. After you glued them together, wait a few minutes for the glue to dry then cut the excess foam off. One side of your drawing is now poster board and the other side is foam.
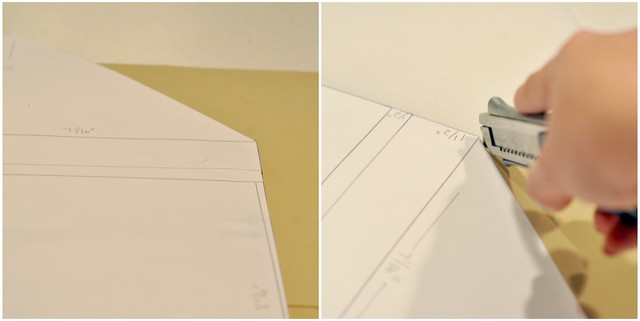
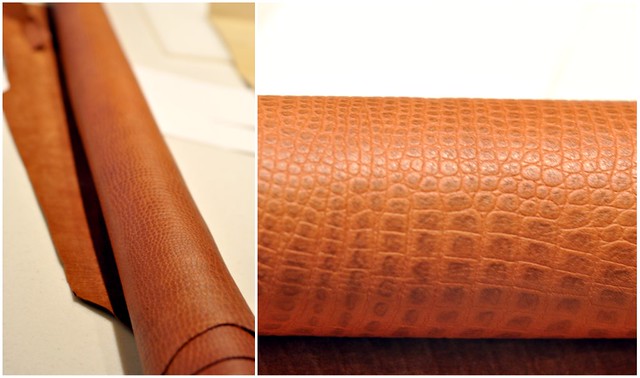
Now, it's time to glue the leather (or vinyl) onto the poster side of your clutch. After the glue has dried, cut the leather 3/4 inches larger all around than the drawing. Then you want to fold in the excess leather, glue and use the binder clips to secure. Wait about 15 minutes for the glue to dry then fold 2 flaps together and glue again.

Now it's time to put in your magnetic snap and your button. You can be done at this point. However, I'd like to add a bit of character to my clutch by adding leather trim all around. At first, I wanted to sew decorative stitches around my clutch but my sewing machine couldn't handle the thickness of the leather. After breaking 2 needles, I gave up. I went to the store and bought a roll of leather trim. I used the same fabric glue and glued the leather trim around the outline of the clutch.

This is the final product. It took me about 3 hours from start to finish. I am happy with the way it turned out (even with a few minor mistakes). I am thinking about making another bright one for summer. You don't have to use leather, vinyl should be just fine. I hope you enjoy the tutorial. If you have any questions, please feel free to leave me a comment.

Have a great week!
Sydney


40 comments:
Wow Sydney your clutch turned out gorgeous! You did such a great job, the button and thread match perfectly as well!
holy cow that looks super fancy! i am so impressed and will try this myself :) thanks so much sydney!
Wow, that is SO cool!! I am very impressed! I'd say that I would do this, but I don't know if I'd ever take the time. But, man, if I decide to, I'm definitely going to follow your tutorial!! :)
wow,thats so pretty! i love it. i just might have to try this one!
Oh, and actually, now that I look at your instructions closer, I don't understand how you turn the flat poster board cut out into an enclosed bag. And how strong is the glue? Are you ever afraid that opening the bag all the time will make it come apart? I'm also curious as to how much room you have in your clutch. Thanks. :)
WOW this looks so professional!! Very awesome tutorial!
I have always wanted to make my own and I think this tutorial will spur me on to make one :)
katattack2000.wordpress.com
You did an amazing job! What a great way to use up those rolls of leather!
I really like the color and button detail- can't wait to see it with an outfit:)
@Erica I forgot to take pictures before I glued it. If you look at my drawing, you would fold the poster board in half (where the middle 18" line was). Then glue the 4 sides (where the 8 1/4" line was) together. That would make an enclosed bag. Does that make sense? The glue is pretty strong. The one I used is for fabric but there are ones specifically for leather. I don't think the seams would come apart but if they do, I can always glue them back. This clutch fits my iPpad, my phone and a small wallet. Hope that helps.
what a fantastic job!
Omigosh, this looks fantastic! Echoing some of the other comments, please keep us updated on how it holds up with just the glue alone and if you have to re-glue it. Did you try industrial weight sewing needles? I might be making that up, but I remember people having sewing needs just for denim, etc, because my needles always broke when I tried to sew thicker jeans.
That's so pretty! Do you think your needles would hold up if the fabric were vinyl instead, or would it still pose a problem because of the thickness?
You did a really good job! It came out so nicely! I hope you get around to the video tutorial at some point - would love to watch and learn from it!
wow! that's pretty awesome! <3
wow the outcome is fantastic !!!
Wow, I am sooo impressed! This looks so professional and I love your choice of fabric! Amazing!
www.urbanmantra.blogspot.com
Wow, What a great tutorial! Thanks for sharing!
<3 Kelly
Wow. This a wonderful DIY. Thank you.
Are you vying for SewPetiteGal's job? LOL. This is BEAUTIFUL!!!!!!!! No questions here only b/c I really don't know how to sew and probably wouldnt try something so advanced. BUT thanks for sharing. Cant wait to see what you style with it.
It came out beautifully! You are so creative!
OMG. THAT IS GORGEOUS! I want to try this now. Thanks so much for sharing. Do you have a shop on Etsy?
@Elissa I think my sewing machine should be able to handle vinyl since it's significant thinner than leather. I am going to make another one using vinyl and see how it goes.
@cindy I definitely will keep that mind for my next one. Thank you!
@Lisa Ng I am not competing with SPG at all. She's way more talented than I am =) You should try it. It’s not that bad.
@my mini bag =) No, I don't. I wish!
oh wow now that's pretty awesome!!! umm i think i would have a hard time bc im simply horrible at sewing lol great job Sydney!!!
Now this is my type of DIY, no sewing needed ;) Impressive job, Sydney. The final clutch is beautiful and I really like the subtle pattern of the leather. Can't wait to see how you style it in your outfits!
I've been meaning to comment on this post because it's honestly the best tutorial on DIY clutches I've ever seen. I can't say I am capable of doing this myself but it was so fun to see you put this together!
Wow, I am beyond impressed! I would never be able to do this myself...you should sell these on Etsy! www.casualglamorous.com
Oh that looks gorgeous!! You are so creative!! Can you show some pics with the flap open and the insides?
You are very crafty Sydney, I'm so impressed! From you DIY sparkly skirt to DIY evelope clutches...I can't wait to see what you create next ;)
That is brilliantly made! You are so creative.
Helen
This turned out so beautifully! Looking forward to seeing you rock it in future outfit posts :)
Amazing!! I'm not very crafty but now I'm determined to make my own cross body bag sometime! You can totally make these and sell on etsy or something =)
What a fantastic DIY and all without the need to sew, amazing!! It turned out fabulous and love the trim.
Red Soles and Red Wine
WOW it's looks so good. Great job!
This is awesome Syd! I've always wanted to make my own but don't know how to sew, this is just perfect. Thanks for sharing and I love the material you've used here!
Thanks for the awesome tutorial! This looks super easy to make, and no sewing required is a major plus because I don't own a sewing machine. Yours came out really nice! I love the leather trim around the edges :)
I love this, just one thing. I live in Spain and it's quite hard to translate all these materials, so my question is how thick is the foam that you use? Is there any other detail about the foam that I could use to explain the shops here what I need? Thank you so much!
The envelope came out nicely! I love the elegance and glamour it produces!
Annabella Merlin
Creative Photo Albums
awesome work :D
Hi just wondering if normal material would work for this project, like Satin? I have wanted to make myself a bag for a while now and this tutorial is fantastic!
Great tutorial, Sydney. Fabulous clutch too. To your credit, i don't even see the mistakes you claim you've made.
Post a Comment